
Christmas sugar cookie decorating ideas start simple: bake a tray of cut-out sugar cookies, let them cool completely, and pick one icing method (royal icing, buttercream, or a powdered sugar glaze) plus one shape. The sixteen designs below are grouped so you can jump to the level that matches your skill and time, from a five-minute sprinkle cookie to a layered royal icing ornament.
Most of these cookies are forgiving. I tested them on a Sunday with my niece’s table of eight kids, and the ones that survived were the glazed and sprinkle-only designs (items 9 and 10). If you are decorating with kids, start there. If you are after a bakery-style tray for a Christmas Eve platter, scroll to the royal icing and buttercream designs further down.
Table of Contents
- Christmas Sugar Cookie Decorating Ideas at a Glance
- 1. Classic Snowflake Sugar Cookies
- 2. Royal Icing Christmas Ornament Cookies
- 3. Mitten Cookies with Royal Icing Cuffs
- 4. Gingerbread-Style Sugar Cookies with Royal Icing Trim
- 5. Christmas Tree Cookies with Buttercream Layering
- 6. Candy Cane Striped Sugar Cookies
- 7. Wreath Cookies with Buttercream and Sprinkles
- 8. Holly Leaf and Berry Cookies
- 9. Easy Glazed Sugar Cookies (Beginner-Friendly)
- 10. Sprinkle-Only Sugar Cookies (No Piping)
- 11. Stained Glass Window Sugar Cookies
- 12. Santa Belt Cookies with Fondant Buckle
- 13. Penguin Sugar Cookies for the Kids’ Table
- 14. Stocking Cookies with Royal Icing Name Tags
- 15. Peppermint Swirl Glazed Cookies
- 16. Gift Box Cookies with Bow Detail
- Frequently Asked Questions
- How far ahead can I decorate Christmas sugar cookies before the holiday?
- Royal icing or buttercream: which holds up better for sugar cookies?
- Why is my royal icing bubbling and how do I fix it?
- Should I decorate sugar cookies when they are warm or fully cooled?
- What is the best way to ship decorated sugar cookies without smudging the icing?
- Wrap-Up: Start With One Shape and One Icing
Christmas Sugar Cookie Decorating Ideas at a Glance
| # | Shape | Icing Style | Difficulty | Best For |
|---|---|---|---|---|
| 1 | Snowflake | Royal icing flood + sanding sugar | Medium | Platter centerpiece |
| 2 | Round ornament | Royal icing flood | Medium | Tree ornaments, gift tags |
| 3 | Mitten | Royal icing flood + cuff | Medium | Hot cocoa tray |
| 4 | Gingerbread man | Royal icing outline + details | Medium | Classic family tray |
| 5 | Christmas tree | Buttercream layering | Medium | Platter showpiece |
| 6 | Candy cane | Royal icing half-and-half | Medium | Platter edges |
| 7 | Wreath | Buttercream swirl + sprinkles | Easy | Platter filler |
| 8 | Holly leaf | Royal icing two-tone | Medium | Platter filler |
| 9 | Any shape | Powdered sugar glaze | Easy | Beginners, kids |
| 10 | Any shape | Sprinkles only | Easy | Kids’ table, last-minute |
| 11 | Any shape with cutout | Melted hard candy | Medium | Window tray, light catching |
| 12 | Rectangle (Santa belt) | Royal icing + fondant | Advanced | Platter novelty |
| 13 | Oval (penguin) | Royal icing multi-color | Medium | Kids’ table |
| 14 | Stocking | Royal icing flood + name | Medium | Place cards, gifts |
| 15 | Round (peppermint) | Glaze swirl | Easy | Platter filler |
| 16 | Square (gift box) | Royal icing flood + bow | Medium | Platter showpiece |
1. Classic Snowflake Sugar Cookies
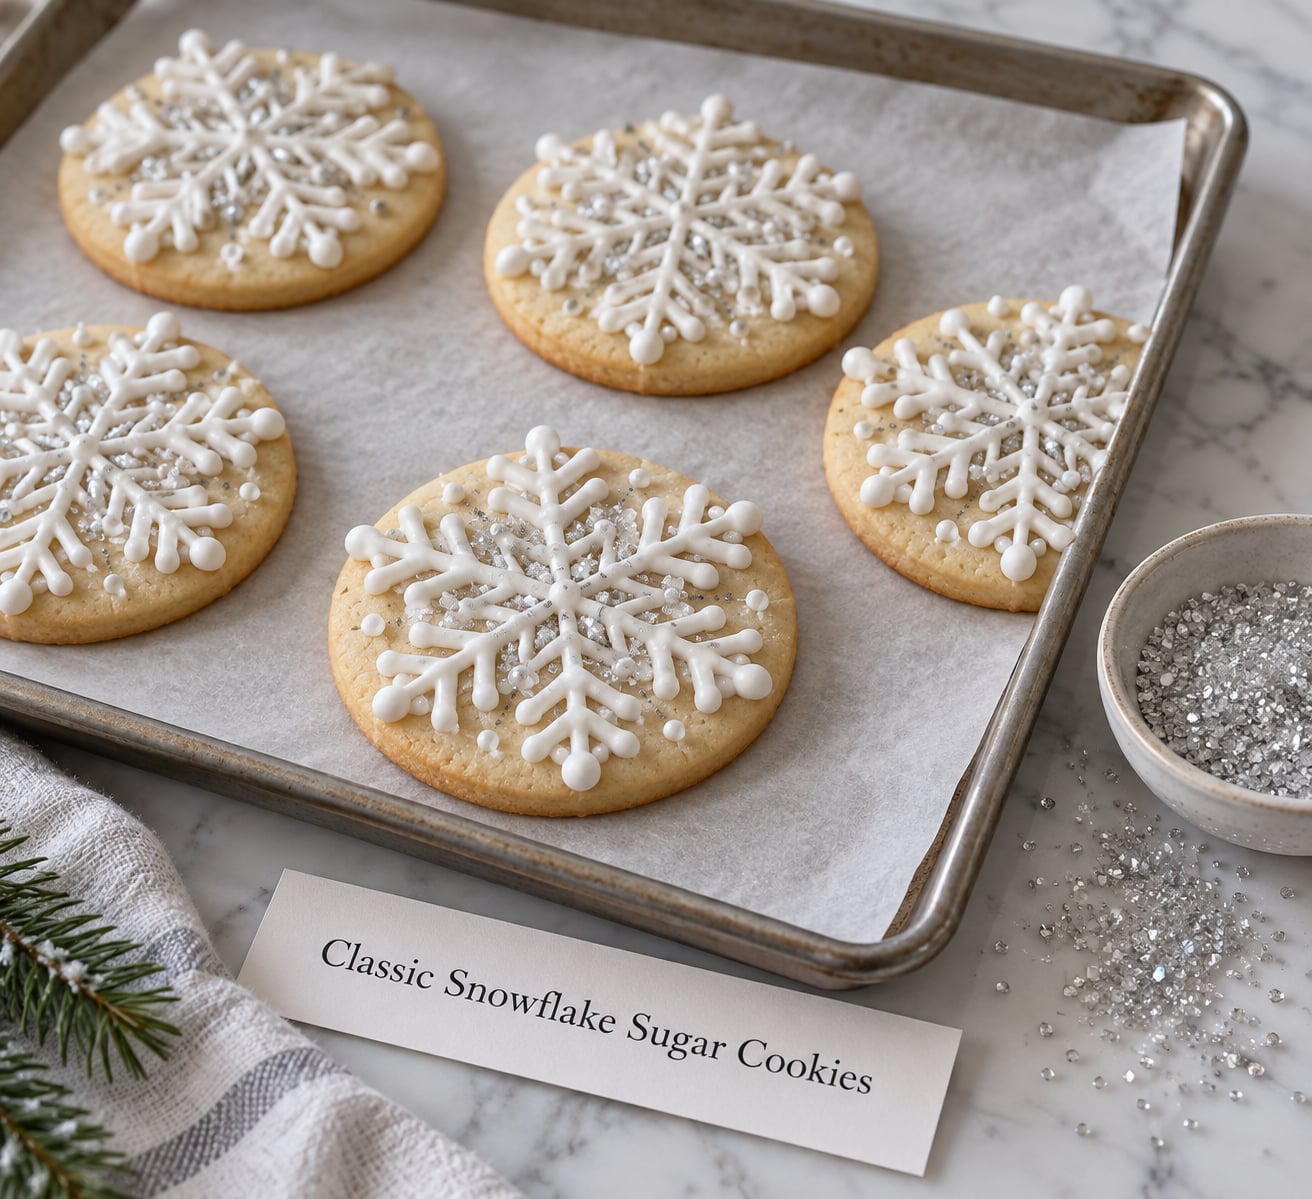
A snowflake cutter covered in white royal icing is the most forgiving place to start a piped design, because every flaw looks like a snowflake pattern. Roll the dough to about 1/4 inch thick and cut with a 3-inch snowflake cutter. Flood the cookie with a 15-second royal icing (icing that flows back together in about 15 seconds when you drag a knife through it), then pipe lines of detail-consistency icing (thicker icing that holds its shape for fine work) across the top with a #2 tip to mimic a lattice. While the flood icing is still wet, drag a scribe tool or toothpick from the center outward to pull the icing into a six-pointed pattern, then finish with a sprinkle of fine silver sanding sugar.
Concrete example: a pale blue flood base (one drop of sky-blue gel paste), white royal icing lines piped in a crosshatch, a draggable silver dragée pressed into the center while the icing is still wet. The silver dragée dries in place without falling off.
2. Royal Icing Christmas Ornament Cookies
Round ornament cookies look impressive and only need a circle cutter, a flood bag, and a steady hand for the top loop. Cut 3-inch rounds, bake, and let them cool fully. Outline the edge with detail-consistency royal icing, then flood the inside with a 15-second flood in red, green, or gold. While the flood is still wet, pipe a small loop of white royal icing at the top of the circle to form a hanger, then add a swirl with a #1.5 tip for a bit of decoration.
Concrete example: a red flood on a 3-inch round, a #1.5 tip piping a tight swirl on top, a small white royal icing loop that dries hard enough to thread a ribbon through and hang from a tree. Bake a few extras, because the loop is the part that snaps off first if the cookie is dropped.
3. Mitten Cookies with Royal Icing Cuffs
Mittens are a forgiving shape for first-time royal icing decorators because the cuff hides any wobble at the top edge. Cut 3-inch mitten shapes, bake, and cool. Flood the body of the mitten in any color with a 15-second flood, then pipe a thicker cuff in white at the wrist with detail-consistency icing. While the cuff is wet, pipe a small snowflake or an initial with a #1 tip.
Concrete example: a red flood on the body of a 3-inch mitten, a white royal icing cuff piped across the wrist about 1/2 inch wide, a small initial (or a simple snowflake dot pattern) added with a #1 tip while the cuff is still wet. A box of these with a name on each makes a personal classroom gift.
4. Gingerbread-Style Sugar Cookies with Royal Icing Trim
Gingerbread men cut from sugar cookie dough look almost the same as the gingerbread variety, and you can skip the extra bake time. Tint the dough slightly brown with a teaspoon of molasses or a pinch of cocoa to get the gingerbread color, cut with a gingerbread man or woman cutter, and bake. Outline the cookies with a 15-second brown royal icing, then flood the inside with the same icing. Once the base is dry (about 20 minutes), pipe eyes, a smile, buttons, a heart, and a bow tie in white royal icing with a #1 tip.
Concrete example: gingerbread-colored dough (extra molasses), a 15-second brown outline and flood, white details piped on after drying, a royal icing smile piped last so it sits on top of the other details.
5. Christmas Tree Cookies with Buttercream Layering
Tree cookies look bakery-quality with a single star tip and a few minutes of layering. Cut tree shapes, bake, and cool. Tint buttercream green (Americolor leaf green is a common home-baker choice) and load a piping bag fitted with a Wilton 16 star tip. Pipe a small dot of green buttercream at the top of the cookie, then add progressively larger dots down the tree, each one slightly overlapping the last. Press draggable silver dragées into the buttercream while it is still soft, then finish with a yellow buttercream star piped on top.
Concrete example: green buttercream piped from top to bottom with a Wilton 16 tip in five tiers, a draggable silver dragée added to each tier, a small yellow buttercream star on top. Reviewers on baking forums often note that this is the design that uses up the most buttercream per cookie, so double the batch if trees are the centerpiece.
6. Candy Cane Striped Sugar Cookies
The half-red, half-white candy cane look is done by masking half the cookie with parchment while you flood the other side. Cut candy cane shapes, bake, and cool. Place a small piece of parchment over one half of the cookie, then flood the exposed half with red royal icing. Lift the parchment carefully after 30 seconds, let the red side dry for about an hour, then mask the red side and flood the other half with white royal icing. Finish with a light dusting of clear sanding sugar for a frosted shimmer.
Concrete example: red royal icing on one side of a candy cane, white royal icing on the other, a clean line down the center where the two meet, finished with a clear sanding sugar shimmer. A small offset spatula helps press the parchment down to keep the line crisp.
7. Wreath Cookies with Buttercream and Sprinkles
Wreath cookies are a buttercream and sprinkles project, and the leaf tip does most of the work. Cut 2.5-inch round cookies, bake, and cool. Tint buttercream green, load a piping bag with a Wilton 67 leaf tip, and pipe a ring of small leaves around the outer edge of the cookie. Pipe a second inner ring slightly overlapping the first to fill the center, then immediately press red and green nonpareils (tiny round sprinkles) and a few holly-shaped sprinkles into the buttercream. Pipe a small buttercream bow at the bottom.
Concrete example: green buttercream piped in a circle with a Wilton 67 leaf tip in two layers, draggable red and green sprinkles added while the frosting is wet, a buttercream bow in the center made of three small dots. Reviewers on r/Baking point out that holly sprinkles can bleed red into the green buttercream, so add them last and only on the cookies you plan to eat within a day.
8. Holly Leaf and Berry Cookies
Holly leaf cookies use a two-tone green royal icing for the leaf and three red dots in the center for the berries. Cut with a holly leaf cutter, bake, and cool. Flood each leaf with a dark green 15-second royal icing, then pipe a light green vein down the center with a #1 tip once the flood has set (about 10 minutes). Cluster three red royal icing dots in the center of each leaf with a #1.5 tip.
Concrete example: a dark green flood base, light green vein lines piped with a #1 tip, three red royal icing dots clustered in the center where the leaf points meet. The vein lines are a one-second detail, but they make the cookie look hand-painted rather than flat.
9. Easy Glazed Sugar Cookies (Beginner-Friendly)

If you have never piped royal icing, a powdered sugar glaze is the friendliest place to start. Whisk 2 cups of powdered sugar with 2 tablespoons of milk and 1 teaspoon of vanilla until smooth, then add gel food coloring one drop at a time until you reach the color you want. Drizzle the glaze over each cooled cookie with a spoon, or dip the top of the cookie directly into the bowl. Top with sprinkles before the glaze sets (about 5 minutes).
Concrete example: 2 cups powdered sugar, 2 tablespoons milk, 1 teaspoon vanilla, colored with one drop of red gel, drizzled over a star-shaped cookie with a spoon and topped with white nonpareils. This is the design my niece’s table finished in under ten minutes, and they were the most colorful on the tray.
10. Sprinkle-Only Sugar Cookies (No Piping)
The fastest decoration of all is also the one that works for last-minute trays: a thin egg wash or glaze and a heavy hand with sanding sugar, sparkle sugar, or nonpareils. Roll the cut-out cookie dough in sanding sugar before baking for a sparkly base, then press a sprinkle mix on top of the baked and cooled cookie using a thin glaze or a brush of corn syrup as glue.
Concrete example: a star cutter rolled in red sanding sugar before baking, plus a sprinkle mix (green nonpareils, white jimmies, red sugar pearls) pressed on after baking for texture and color. This is the design to assign to the youngest decorators, because almost nothing can go wrong.
11. Stained Glass Window Sugar Cookies
Stained glass cookies look magical held up to a Christmas tree light, and the technique is just melted hard candy in a cutout. Cut cookie shapes with a small star or gingerbread man cutter, then use a smaller cutter to remove a shape from the center of each cookie. Place the cookies on parchment, fill the cutout with crushed red and green hard candy (Lifesavers or Jolly Ranchers both work), and bake at a low 300 degrees F until the candy melts clear, about 8 minutes. Let the cookies cool fully on the tray so the candy hardens.
Concrete example: a mitten cutter with a small star cutout filled with crushed red and green hard candy before baking, baked at 300 degrees F until the candy bubbles clear. The candy pulls away from the dough slightly as it cools, which is normal and is part of the look.
12. Santa Belt Cookies with Fondant Buckle
Santa belt cookies are a 3-step project: red royal icing base, a black fondant belt stripe, and a yellow fondant buckle. Cut 3-inch rectangle cookies, bake, and cool. Flood each cookie with red royal icing and let it dry for at least an hour. Lay a black fondant strip about 1 cm wide across the middle of the cookie, then add a small yellow fondant square as the buckle with a smaller black fondant square in the center.
Concrete example: red royal icing flood on a 3-inch rectangle, a black fondant strip across the middle, a yellow fondant square buckle with a smaller black square in the center. The fondant pieces can be glued to the icing with a tiny brush of water.
13. Penguin Sugar Cookies for the Kids’ Table
Penguins are the cookie to assign to kids who have used a piping bag once or twice. Cut oval cookies, bake, and cool. Flood about two-thirds of the oval with black royal icing to form the back and head. Once the black flood is dry (about 20 minutes), flood a smaller white oval on the belly, then add a small orange royal icing triangle for the beak and two small black dots for the eyes.
Concrete example: black royal icing flood covering two-thirds of an oval, a white royal icing oval on the belly, an orange royal icing triangle for the beak, two black dots for the eyes. A small offset spatula is the easiest way to shape the white belly oval before the icing sets.
14. Stocking Cookies with Royal Icing Name Tags
Stocking cookies double as edible place cards when you pipe a name on each one. Cut stocking shapes, bake, and cool. Flood each stocking with a 15-second royal icing in any color, then pipe a white cuff at the top with detail-consistency icing. Once the cuff is set, pipe a name in red royal icing with a #1 tip, and finish with a small pompom of white royal icing at the toe.
Concrete example: a red stocking flood, a white cuff, a family member name in red royal icing using a #1 tip, draggable white sanding sugar on the cuff. A box of these with a name on each also works as a hostess gift if you are headed to someone else’s house for the holiday.
15. Peppermint Swirl Glazed Cookies
Peppermint swirl cookies use the same glaze as item 9, but two colors and a toothpick create the swirl. Cut round cookies, bake, and cool. Flood each cookie with a white powdered sugar glaze, then drop small dots of red glaze on top of the wet white glaze. Drag a toothpick through the dots in a spiral pattern (from the center outward) to create the swirl before the glaze sets.
Concrete example: white glaze flooded first, red glaze dots dropped on top, dragged through with a toothpick to create a swirl before the glaze sets. The swirl only takes about 10 seconds per cookie once you get the rhythm, so a tray of 24 is a 20-minute job.
16. Gift Box Cookies with Bow Detail
Gift box cookies finish the tray with a square shape, a flooded base, and a piped bow. Cut 3-inch square cookies, bake, and cool. Flood each square in a solid color (green, red, or gold) with a 15-second royal icing. Once the flood is dry, pipe a cross of white royal icing lines on top with a #1.5 tip to look like ribbon, then pipe a small royal icing bow at the center.
Concrete example: a green flooded square, white royal icing lines piped in a cross pattern to look like ribbon, a small white royal icing bow piped at the center. Two small dots and a short line in the middle are enough to suggest a bow without needing a fancy tip.
Frequently Asked Questions
How far ahead can I decorate Christmas sugar cookies before the holiday?
Most decorated Christmas sugar cookies hold up well for 1 to 2 weeks when stored in an airtight container at room temperature, with royal icing keeping slightly longer than buttercream. For the freshest taste and the cleanest icing, decorate 2 to 5 days before you plan to serve them. If you want to start earlier, freeze the undecorated baked cookies for up to 2 months and decorate them after thawing.
Royal icing or buttercream: which holds up better for sugar cookies?
Royal icing holds up better for sugar cookies in warm rooms and for shipping, because it dries hard and will not smear once set. Buttercream tastes softer and is more forgiving for beginners, but it needs to stay cool and should not be stacked for at least 12 hours. For a tray that will sit out for a party, use royal icing; for a tray that will be eaten the same day, buttercream is fine.
Why is my royal icing bubbling and how do I fix it?
Royal icing bubbles when air is trapped between the icing and the cookie surface, usually because the flood was too thick, the cookie was warm, or the icing was mixed on high speed. To fix it, pop the bubbles with a scribe tool or toothpick as soon as you see them, or thin the icing a little and reflood the affected area. Mixing royal icing on low speed and letting it rest for a few minutes before loading the bag reduces bubbles significantly.
Should I decorate sugar cookies when they are warm or fully cooled?
Always decorate sugar cookies when they are fully cooled, ideally at room temperature for at least 1 to 2 hours after baking. Warm cookies will melt royal icing, slide buttercream, and cause sprinkles to bleed color. If you are in a hurry, you can speed cooling by placing the cookies on a wire rack for 15 to 20 minutes before decorating.
What is the best way to ship decorated sugar cookies without smudging the icing?
The best way to ship decorated sugar cookies is to let the icing dry completely for at least 24 hours, then layer the cookies between sheets of parchment in a rigid box with bubble wrap on the outside. Avoid bubble wrap directly on the icing, because the texture can imprint. Ship the box with a cold pack in warm weather and choose a delivery speed of 2 days or less so the cookies arrive firm.
Wrap-Up: Start With One Shape and One Icing
The fastest path to a tray that looks bakery-good on the first try is to pick one shape and one icing, bake a small test batch of six, and only then commit to the full tray. If you are brand new to piping, start with item 9 (the easy glaze) or item 10 (sprinkles only), and let the kids or the table guests finish the rest. If you are comfortable with a piping bag, item 1 (snowflake) is the most forgiving royal icing design on the list.
The rest of the tray can grow from there: a few mitten cuffs in item 3, a couple of trees from item 5, a stack of gift box cookies from item 16, and the platter comes together without a single late-night decorating panic. Christmas baking stays fun when the first batch is small, the design is one shape, and the icing is the one you already know.