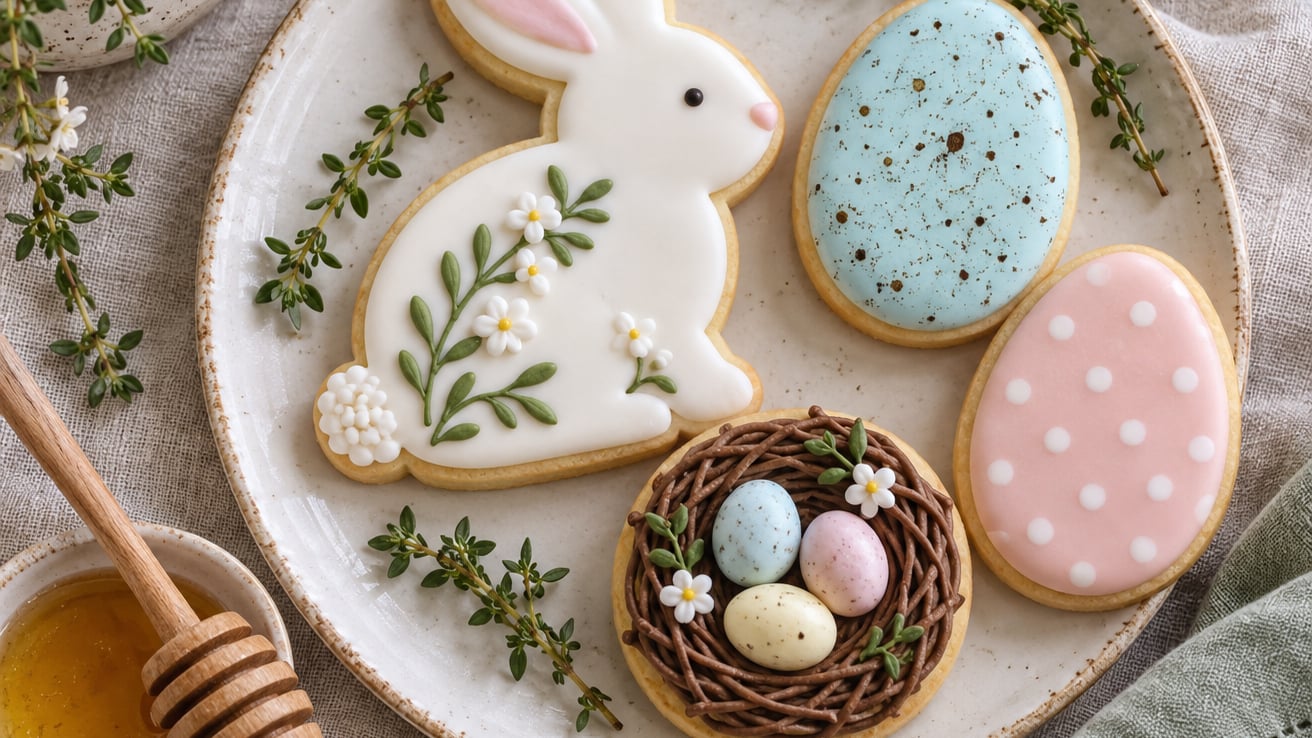
Easter cookie decorating ideas range from quick pastel-iced bunnies to picture-perfect speckled robin eggs, and most of them need only a basic sugar cookie, a batch of royal icing, and a couple of piping tips. I bake a lot of spring cookies at home, and these 15 designs are the ones I keep coming back to because they look like a million bucks but only ask for 20 to 45 minutes of decorating per batch. Whether you are hosting an Easter brunch, packing treat bags for class, or just want a rainy-Saturday project with the kids, you’ll find something here that fits your skill level and your schedule.
This roundup skips specialty airbrush equipment and silicone molds. If you have a stand mixer, a few piping bags, and standard round and star tips, you can make every single one of these cookies on a regular weeknight.
Table of Contents
- Easter Cookie Decorating Ideas at a Glance
- 1. Pastel Bunny Sugar Cookies
- 2. Robin’s Egg Speckled Cookies
- 3. Carrot Patch Cookies
- 4. Fluffy Chick Cookies
- 5. Easter Egg Sugar Cookies
- 6. Marshmallow Peep-Inspired Cookies
- 7. Bunny Butt Cupcake Toppers
- 8. Nest Cookies with Cadbury Mini Eggs
- 9. Lamb Cookies
- 10. Easter Bunny Face Cookies
- 11. Tie-Dye Watercolor Cookies
- 12. Flower Crown Bunny Cookies
- 13. Polka Dot Egg Cookies
- 14. Peep Silhouette Cookies
- 15. Garden Carrot Handprint Cookies
- Frequently Asked Questions
- What is the best sugar cookie recipe for Easter cookie decorating?
- Do I need royal icing for Easter cookie decorating ideas, or can I use buttercream?
- How far ahead can I decorate Easter sugar cookies?
- How do I get smooth, flooded icing without it running off the cookie?
- What food coloring works best for pastel Easter cookie designs?
- How should I store decorated Easter cookies before the holiday?
Easter Cookie Decorating Ideas at a Glance
Here’s a quick scannable overview of all 15 designs so you can jump to the one that matches your skill level, your time, and the cookie cutters you already own. The technique column tells you the main method, and the best base tells you which cookie dough works best for clean edges and crisp designs.
| # | Idea | Technique | Skill Level | Best Cookie Base |
|---|---|---|---|---|
| 1 | Pastel Bunny Sugar Cookies | Outline and flood | Beginner | Cut-out sugar cookie |
| 2 | Robin’s Egg Speckled Cookies | Flood and flick | Beginner | Round or egg-shaped sugar cookie |
| 3 | Carrot Patch Cookies | Round piping | Beginner | Round sugar cookie |
| 4 | Fluffy Chick Cookies | Star-tip piping | Intermediate | Chick-shaped sugar cookie |
| 5 | Easter Egg Sugar Cookies | Outline and detail | Intermediate | Egg-shaped sugar cookie |
| 6 | Marshmallow Peep-Inspired Cookies | Sanding sugar | Beginner | Bunny or chick sugar cookie |
| 7 | Bunny Butt Cupcake Toppers | Layered details | Intermediate | Mini round sugar cookie |
| 8 | Nest Cookies with Cadbury Mini Eggs | Buttercream nest | Beginner | Round sugar cookie |
| 9 | Lamb Cookies | Dot texture piping | Intermediate | Lamb-shaped sugar cookie |
| 10 | Easter Bunny Face Cookies | Fine detail piping | Intermediate | Round or egg-shaped sugar cookie |
| 11 | Tie-Dye Watercolor Cookies | Wet-on-wet brush | Intermediate | Egg-shaped sugar cookie |
| 12 | Flower Crown Bunny Cookies | Buttercream rosettes | Intermediate | Bunny-shaped sugar cookie |
| 13 | Polka Dot Egg Cookies | Dot piping | Beginner | Egg-shaped sugar cookie |
| 14 | Peep Silhouette Cookies | Sanding sugar fill | Intermediate | Chick or bunny sugar cookie |
| 15 | Garden Carrot Handprint Cookies | Sprinkle and pipe | Beginner | Round sugar cookie |
1. Pastel Bunny Sugar Cookies

A pastel bunny cookie is the friendliest first project for someone new to royal icing. Cut your sugar cookie dough with a bunny cutter, then outline each one with a piping bag fitted with a small round tip (a Wilton 2 or 3 works perfectly).
Thin a portion of the same icing with a teaspoon of water at a time until it ribbons smoothly off the spoon, then flood inside the outline. Pastel pink, baby blue, soft yellow, and lavender all feel like Easter without competing with each other.
Once the flood icing is dry (about 20 minutes), pipe a small white muzzle dot, a tiny pink nose, and two black seed-pearl eyes. The trick is to keep the eyes the same size on every cookie, so I drop the icing and let it settle for a second before picking up the bag to move on.
2. Robin’s Egg Speckled Cookies
These are the cookies that get the most “ooh” per minute of effort. Start with a round or egg-shaped sugar cookie and flood it with pale robin’s-egg blue royal icing. Let it dry completely, ideally for an hour, so the surface is firm enough to take the speckles without denting.
For the speckles, dip a clean toothbrush in a small bowl of brown food coloring gel mixed with a few drops of water, then pull the bristles back with your thumb while hovering over the cookie. The little droplets that spray out look exactly like the spots on a real robin egg.
If you don’t have a toothbrush, a stiff-bristled pastry brush flicked with a butter knife works in a pinch. Let the cookies dry another 20 minutes before stacking them, since the brown droplets stay slightly soft.
3. Carrot Patch Cookies
Carrot patch cookies are a great way to use up the round sugar cookies that never quite fit a bunny or egg cutter. Outline the edge with green royal icing and flood the inside with orange. The carrot shapes go on after the base is dry, so plan for two layers.
Pipe three or four thin orange carrot shapes in the center, pointy ends down, using a small round tip. Then add a few green buttercream leaves on top with a small star tip. A thin border of brown royal icing around the outside edge mimics the look of soil without going overboard.
For a kid-friendly version, let little ones place green-tinted shredded coconut on top of wet green icing to make the leafy tops. They get genuinely excited, and you do almost none of the work.
4. Fluffy Chick Cookies
Fluffy chick cookies look harder than they are, and the “fluff” is really just a star tip doing the heavy lifting. Cut chick-shaped cookies and flood the body with bright yellow royal icing, then let it dry for 30 minutes so the next layer sits on top without sinking.
Fit a piping bag with a small open star tip (Wilton 16 or 18) and pipe a tight cluster of yellow star bursts over the chick’s head and back. Each squeeze makes a little tuft that looks like downy feathers, and small mistakes blend in beautifully.
Finish with an orange royal icing beak and two tiny black dot eyes. The eyes look best when they are about the size of a sesame seed, so use a piping bag with a very fine round tip or a black food coloring pen for the cleanest result.
5. Easter Egg Sugar Cookies
The classic Easter egg sugar cookie is where you get to play with pattern. Cut egg-shaped cookies and flood them with one pastel base color per cookie, then let them dry fully before adding the details. Patience here saves a lot of bleeding color later.
Use a small round piping tip to draw vertical stripes, zigzags, polka dots, and tiny flower clusters on the dry surface. Stick to two or three colors per cookie so the design stays readable. The “paint-by-number” feel comes from the consistency of your line weight, so keep your piping tip and your hand speed steady.
If you want a stained-glass look, outline the egg with thick royal icing, then flood it with thinned icing tinted in two colors. The colors meet but don’t fully blend, and the outline keeps everything tidy.
6. Marshmallow Peep-Inspired Cookies
Peep-inspired cookies are perfect for kids because the decorating step is just “shake and tap.” Cut bunny or chick-shaped cookies and flood them with pastel royal icing in the original Peep colors: bright pink, yellow, blue, and lavender.
While the icing is still wet, sprinkle pastel sanding sugar generously over the top and let it sit for 30 seconds. Tap the cookie gently on the counter to shake off the excess, and the surface ends up with a sparkly, slightly grainy coating that looks just like the sugar-dusted marshmallow.
These dry hard in about an hour and stack well in cookie tins. They also travel nicely in cellophane bags tied with pastel ribbon for class parties.
7. Bunny Butt Cupcake Toppers
Bunny butt toppers are the cutest little trick for Easter cupcakes, and they sit on a mini round sugar cookie. Frost a base layer of pink or white royal icing and let it dry. Then add two mini marshmallows cut in half for the feet, and a small white buttercream ball in the center for the tail.
Use a tiny dot of pink royal icing to give the marshmallow feet a paw pad, and a black food coloring pen to draw in the lines. The whole topper takes about five minutes once the base icing is set, and it makes any plain cupcake look like an Easter basket.
For a faster version, use jumbo white chocolate buttons as the feet and a pink Sixlet candy as the tail. The kids won’t notice the shortcut, and you will notice the time you saved.
8. Nest Cookies with Cadbury Mini Eggs
Nest cookies are a one-piping-tip project that looks more elaborate than it is. Frost a round sugar cookie with a thick layer of chocolate buttercream, then use a small open star tip to pipe concentric circles of brown or chocolate buttercream to mimic a twig nest.
While the buttercream is still soft, nestle three or four candy-coated chocolate eggs in the center. Press them in just enough so they grip the buttercream without sinking.
These are best assembled the morning you plan to serve them, since the candy eggs can bleed color into the buttercream if they sit for more than a day. If you need to make them ahead, hold the eggs and add them at the last minute.
9. Lamb Cookies
Lamb cookies use a clever two-texture trick to mimic wool. Flood the face and legs with light gray royal icing, then let it dry. Once the base is set, pipe tiny round dots of white royal icing all over the body using a small round tip, working from the outside in.
Each dot is meant to be slightly different in size, so don’t stress about perfect circles. The dots are the wool, and a slightly imperfect texture looks more like fleece than a row of identical beads.
Finish with two black seed-pearl eyes, a tiny pink nose, and a small pink bow under the chin if you want to lean into the cuteness. Lamb cookies are a project for a calm afternoon because the dotting takes about 15 minutes per cookie.
10. Easter Bunny Face Cookies
Bunny face cookies turn a plain round or egg-shaped cookie into a portrait. Start with a white royal icing base and let it dry completely. Then, using a piping bag with a very small round tip, pipe two long ears in pink with a white inner ear line.
Add two small black eyes, a triangular pink nose, and three thin whiskers on each side drawn with a black food coloring pen. The whiskers are the part that always looks better when you draw them last, after the icing is fully set.
For a softer look, use a pale pink flood for the ears and a darker pink for the inner ear. The contrast makes the bunny face pop without looking harsh.
11. Tie-Dye Watercolor Cookies
Watercolor cookies are the closest thing to edible art on this list, and they look impressive on a dessert table. Flood an egg-shaped cookie with thinned white royal icing, then drop a few drops of pastel gel food coloring directly onto the wet surface.
Use a clean, soft-bristled brush to drag the color in long, sweeping strokes from the center outward. The colors will bloom and blend into each other, creating a watercolor wash effect.
Work quickly because the icing starts to set within 90 seconds. If a color goes where you don’t want it, drop a bit of white icing on top and gently pull it into the design with a clean brush. Let these dry for at least two hours before stacking, since the surface stays slightly soft.
12. Flower Crown Bunny Cookies
Flower crown bunnies are an easy way to dress up a basic bunny cookie with buttercream. Frost the bunny-shaped cookie in white or pastel royal icing and let it dry. Then, using a small open star tip, pipe a row of tiny buttercream rosettes across the top of the head in three or four pastel colors.
Each rosette is one squeeze: hold the tip flat against the cookie, squeeze while slowly pulling up and away, then stop squeezing and pull the tip off. The result is a small flower that looks more like a ranunculus than a rose, which suits the springy vibe.
Add a small green buttercream leaf or two between the flowers, and finish the face with the usual dot eyes and pink nose. These look lovely on a brunch table because the buttercream catches the light.
13. Polka Dot Egg Cookies
Polka dot eggs are a great first project for someone who has never piped details before. Flood an egg-shaped cookie with a pastel base color and let it dry. Then, using a small round tip, pipe dots in a contrasting color in a regular pattern: three rows of five, or scattered randomly for a confetti look.
The key to clean polka dots is to keep the piping tip at the same distance above the cookie for every dot. If you pipe too close, the dots flatten; if you pipe too high, they look like tiny peaks. Aim for the tip to sit just above the surface, and squeeze with a steady hand.
These look beautiful in a set of six with different pastel base colors and matching dot colors. They pack flat in a cookie tin and travel well in a lunchbox or a care package.
14. Peep Silhouette Cookies
Peep silhouette cookies are a fun twist on stained glass. Outline a chick or bunny shape with thick royal icing, then flood the inside with thinned royal icing in a single pastel color. Before it sets, pour pastel sanding sugar over the wet icing and tap off the excess.
The result is a sparkly silhouette that looks like a Peep got pressed into glass. The trick is to make the outline slightly thicker than usual so it holds the sugar inside the shape without bleeding into the background.
For a stained-glass effect, divide the silhouette into three or four sections with thin lines of royal icing before you add the sugar. Each section can be a different color, and the lines look like the lead came in real stained glass.
15. Garden Carrot Handprint Cookies
Garden carrot handprint cookies are the project I save for kids under six. Frost a round sugar cookie with green royal icing, leaving the center bare. Drop a single orange jelly bean or a piped orange royal icing carrot into the middle, pointy side up.
Have the child press their hand into the wet green icing, then lift it straight up. The little fingers make perfect grass blades. If your child is older, let them use a piping bag with a small round tip to draw the grass blades instead.
These are charmingly imperfect on purpose, and the kids love seeing their own handprint on a cookie. Set them aside for at least an hour so the green icing firms up before you stack them.
Frequently Asked Questions
What is the best sugar cookie recipe for Easter cookie decorating?
A classic cut-out sugar cookie made with butter, granulated sugar, eggs, vanilla, flour, baking powder, and a pinch of salt holds its shape best during baking and gives you a smooth canvas for icing. Chill the dough for at least an hour before rolling so the cookies keep their edges, and bake at 350 degrees Fahrenheit until the edges are just barely golden. Let them cool completely before you flood them, since warm cookies melt royal icing on contact.
Do I need royal icing for Easter cookie decorating ideas, or can I use buttercream?
Royal icing dries hard and shiny, which is what you want for detailed designs, piped outlines, and cookies that need to stack. Buttercream stays soft and creamy, which is great for nest cookies, flower crowns, and anything you want to look fluffy. Many home bakers use a mix: royal icing for the base and fine details, and buttercream for textured toppings like leaves and rosettes. Both work, so pick the one that matches the design.
How far ahead can I decorate Easter sugar cookies?
Decorated royal icing cookies keep well in an airtight container at room temperature for up to two weeks, so you can decorate them up to 10 to 14 days before Easter. Buttercream-decorated cookies are best used within 3 to 5 days, since the frosting can dry out or pick up fridge odors. Undecorated baked sugar cookies freeze beautifully for up to 3 months in a sealed bag, so you can bake ahead and decorate the week of the holiday.
How do I get smooth, flooded icing without it running off the cookie?
The outline is what holds the flood in. Pipe a slightly thicker outline first and let it set for 2 to 3 minutes so it forms a barrier. Then thin your icing to a honey-like consistency: it should run smoothly off a spoon but leave a trail for a second before disappearing. If the icing is too thin, add more powdered sugar; if it is too thick, add water a few drops at a time. Use a toothpick to nudge the icing into corners and pop any air bubbles before it sets.
What food coloring works best for pastel Easter cookie designs?
Gel food coloring gives you the most control for pastels because a tiny drop tints a big batch without thinning the icing the way liquid food coloring does. For soft pastels, dip a toothpick into the gel and stir it into the icing, then add more in tiny amounts until you hit the shade you want. Natural colorings like freeze-dried raspberry powder, turmeric, and butterfly pea flower work for a dye-free version, though the shades are usually a bit more muted.
How should I store decorated Easter cookies before the holiday?
Layer the cookies between sheets of parchment or wax paper in an airtight container and store them at room temperature away from direct sunlight. Royal icing cookies keep for 10 to 14 days this way. Avoid the fridge, since the moisture can make royal icing sweat and colors can bleed. If you need to stack taller, place a sheet of parchment between every layer and don’t press down on the lid.
Pick two or three designs that match your skill level and the time you have, and bake a small test batch first to dial in your icing consistency. The pastel bunny, the speckled robin egg, and the polka dot egg are the easiest places to start, and they look beautiful on a dessert tray even before you try anything more ambitious. Once your icing feels right, the rest of the list opens up quickly. Happy Easter, and happy decorating.