
Flooding cookies with royal icing is a two-part move: pipe a thick outline around the edge of each cookie to hold everything in, then fill the middle with thinner icing that flows out and levels itself into a smooth, glossy surface. The whole process takes about 30 minutes of active time, dries overnight, and a first-timer can pull it off with a hand mixer and a couple of zip-top bags.
By the end you’ll have flat, professional-looking decorated sugar cookies with that signature shiny finish, ready to stack, gift, or eat. No air bubbles, no jagged edges, no royal icing that bleeds off the cookie before it sets.
Table of Contents
What You Need
You don’t need a pastry school kit to flood cookies. Most of this is probably already in your kitchen, and the rest is one quick trip to the baking aisle.
For the royal icing:
- 4 cups (about 1 lb) powdered sugar, sifted if clumpy
- 3 tablespoons meringue powder (Wilton or Genie brand both work)
- 5 to 6 tablespoons room-temperature water
- 1 teaspoon pure vanilla extract (clear vanilla keeps icing bright white)
- Gel food coloring in your color of choice
For the setup:
- Stand mixer or hand mixer with whisk attachment
- Two or three small mixing bowls for divided colors
- Piping bags, squeeze bottles, or zip-top bags with the corner snipped off
- Round piping tips, sizes 2 or 3, plus couplers if using bags
- Toothpicks or a scribe tool (a needle from the sewing kit works)
- Parchment paper or silicone baking mats
- Cooled, fully baked sugar cookies with flat tops
- A damp paper towel to cover icing bowls between uses
That’s the whole list. No airbrush, no specialty tools, no silicone molds.
Step 1: Make the Royal Icing
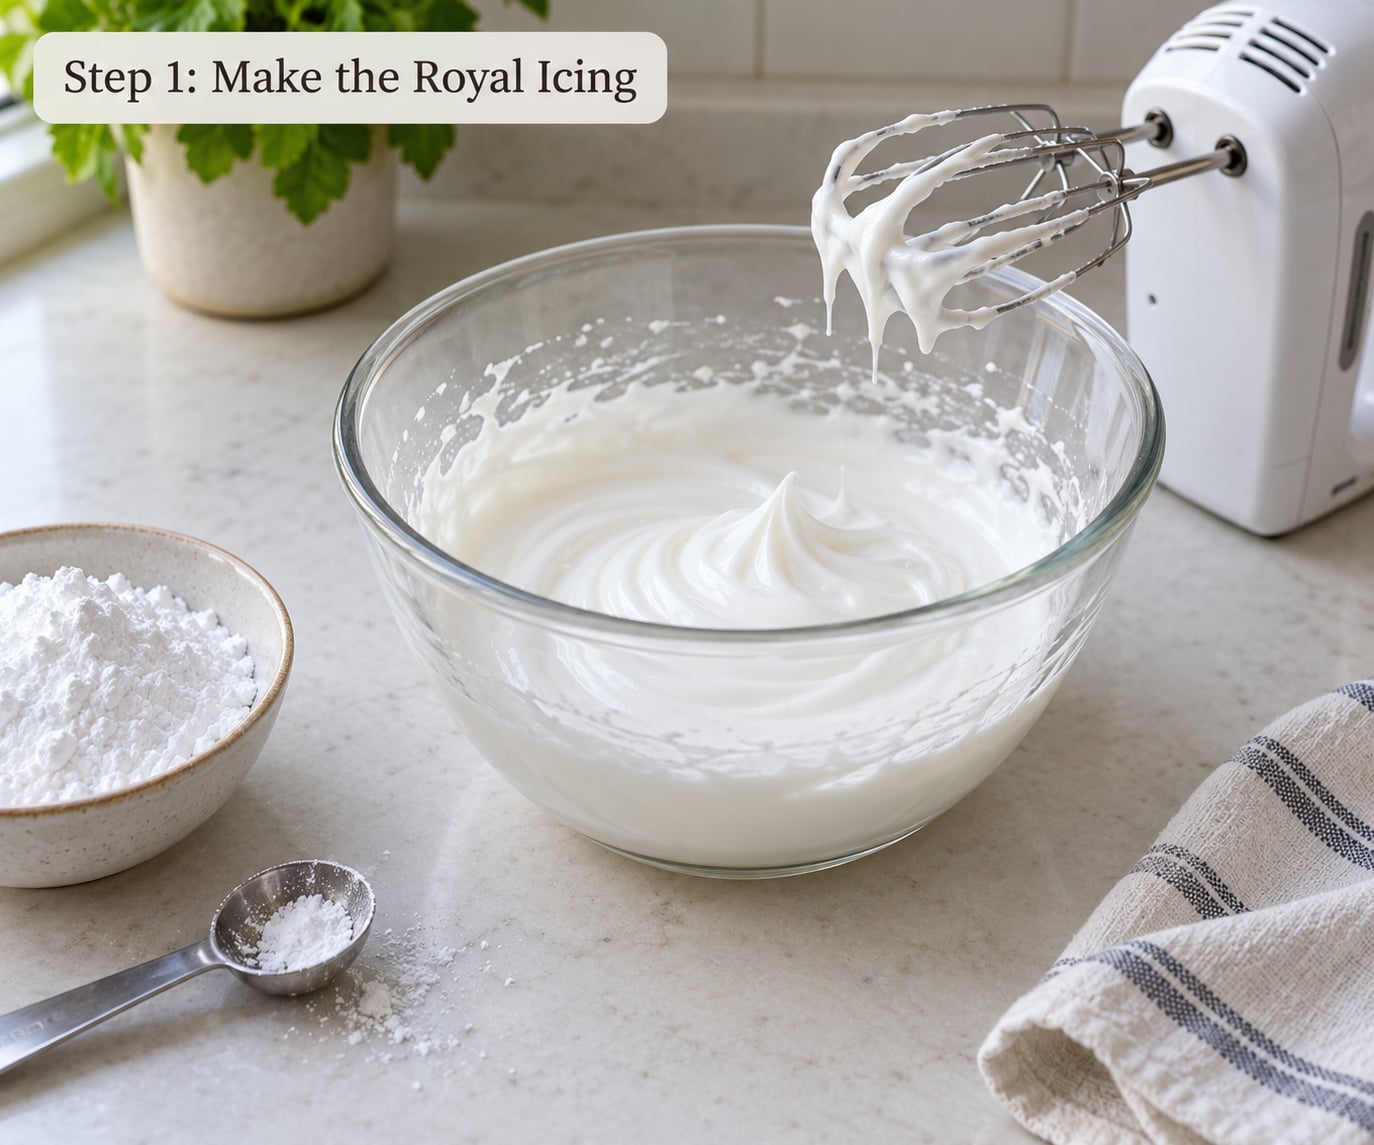
The base recipe makes enough thick icing to outline and flood about two dozen average-size sugar cookies. Pour the powdered sugar and meringue powder into a large bowl, add 5 tablespoons of water and the vanilla, and stir by hand just until the powder is wet. Otherwise you’ll be wearing a cloud of sugar.
Fit your mixer with the whisk attachment and beat on medium speed for about 4 minutes. You’ll see the icing turn from dull to bright white and thicken up. Stop when the icing holds a sharp peak that stands straight up without curling over.
That stiff peak is your outline consistency. You’ll thin a portion of it in the next step to make flood icing. If the icing looks dry or grainy, add the extra tablespoon of water and beat for another 30 seconds.
Step 2: Tint and Thin the Icing
Spoon about a third of the stiff icing into a small bowl for outlining and leave it thick. Divide the rest into separate bowls, one for each color you want to flood.
Add gel food coloring with a clean toothpick. A little goes a long way; stir, then add more until you hit the shade you want. Gel color won’t thin your icing the way liquid food coloring will, which is exactly why the pros use it.
Now thin the colored icing for flooding. Add water a quarter teaspoon at a time, stirring well after each addition. The 10 to 15 second rule is your test: drizzle a ribbon of icing back into the bowl and count how long it takes to disappear into the surface. If the ribbon vanishes in about 10 to 15 seconds, the icing is flood-ready. If it sits on top like a blob, add another quarter teaspoon of water. If it disappears in 3 seconds, you’ve gone too far; beat in a tablespoon of powdered sugar to bring it back.
Cover every bowl with a damp paper towel pressed right onto the surface of the icing. Royal icing starts to crust over within minutes when exposed to air, and that skin ruins a flood.
Step 3: Pipe the Outline
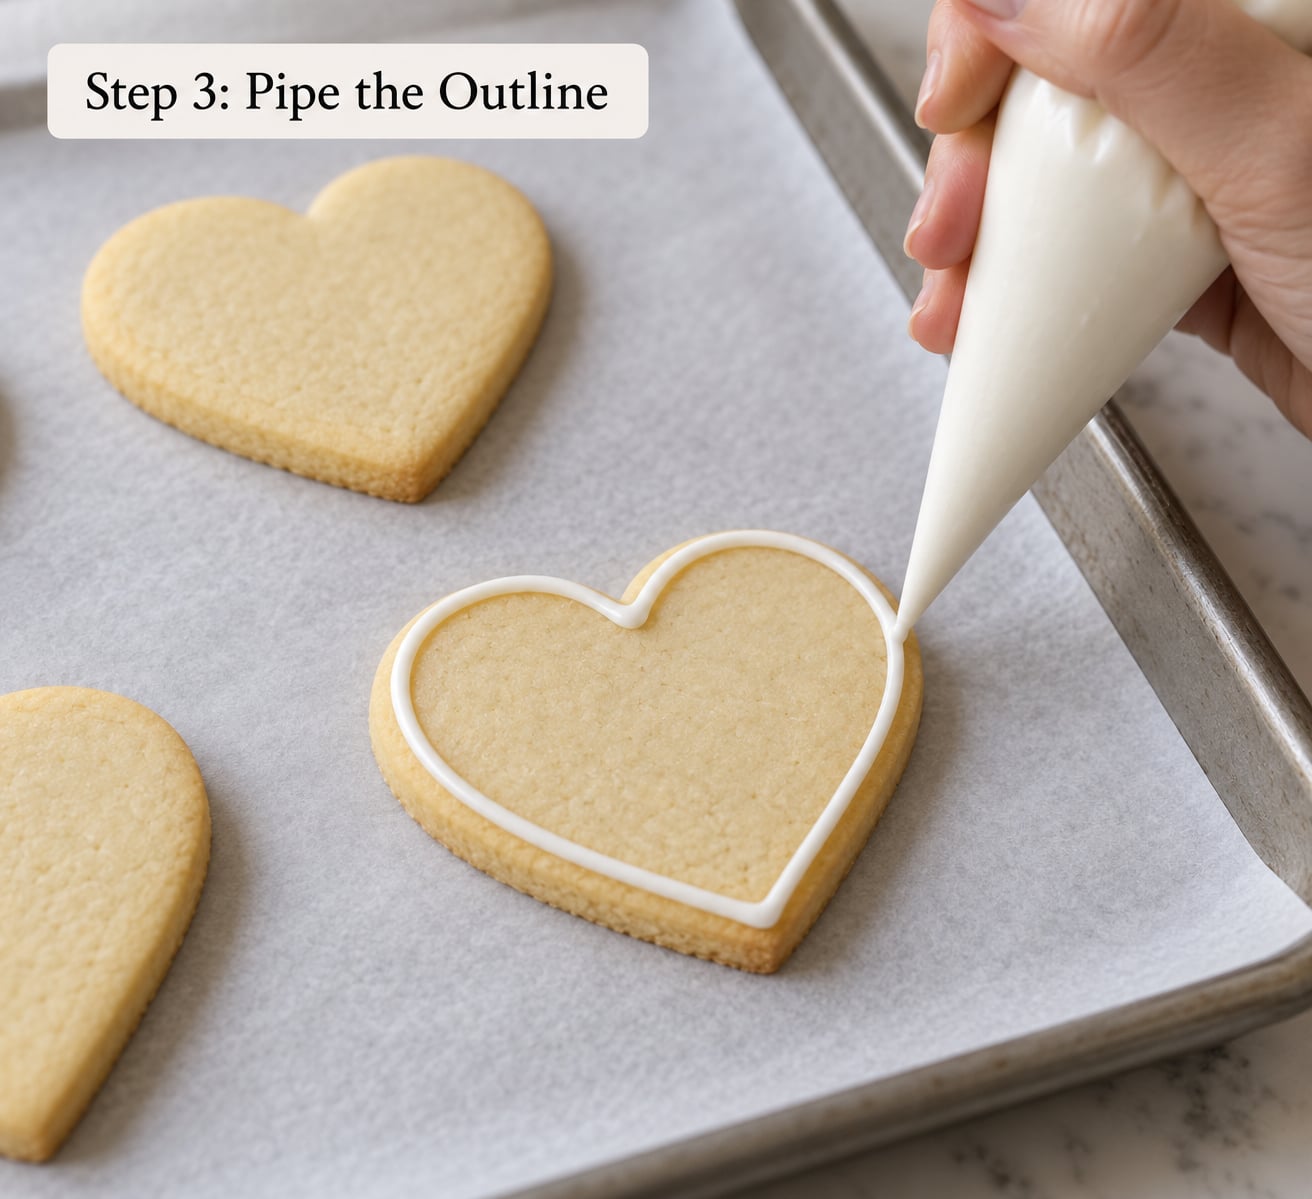
Fit a piping bag with a small round tip (Wilton 2 or 3) and fill it with the thick outline icing. Hold the bag straight up over the cookie with the tip just touching the surface, and squeeze with steady, even pressure.
Trace a clean border all the way around the edge of the cookie, keeping the line tight to the edge and about 1/16 inch tall. Don’t lift the tip until you reach where you started; that’s how you get a closed wall with no gaps for the flood icing to leak through.
You’ll know the outline is right when it sits slightly raised above the cookie and forms a complete ring with no thin spots. If you nick or break the line, patch it before moving on. A broken outline is the number one reason flooded cookies end up with icing puddles on the tray.
Let the outlines set for 2 or 3 minutes while you get your flood icing ready. They should feel dry to a light touch but not fully hardened.
Step 4: Flood the Cookie
Transfer the flood-consistency icing to a squeeze bottle or a fresh piping bag. If you’re using a zip-top bag, snip a small corner, about 1/8 inch across. The opening should be small enough to control the flow but big enough that the icing comes out without forcing it.
Hold the tip just above the center of the outlined cookie and squeeze, letting the icing pool in the middle. Stop squeezing and let gravity do the work; the icing will spread outward on its own toward the outline. Guide it gently toward any edges that are slow to fill, but don’t push past the border.
Stop when the icing reaches just below the top of the outline wall. You want a hair of clearance so the flood doesn’t crest over and make a mess. Leave the cookie flat. Resist the urge to pick up the tray or tilt it to “help” the icing along. That just shifts the cookies and pulls icing where you don’t want it.
Step 5: Pop Air Bubbles and Spread
Within a minute of flooding each cookie, take a toothpick or scribe tool and run it through the icing in slow circles. You’re doing two things: nudging icing into any bare patches, and popping the small air bubbles that floated up while you were piping.
A gentle side-to-side shake of the baking sheet also helps the surface settle. Hold the tray an inch or two above the counter and give it a couple of short, sharp taps from each side. Don’t go wild, or you’ll slosh icing over the outline.
You’ll know the surface is right when it looks glossy and even, with no pinholes, ridges, or dull spots. This is also the moment to add any wet-on-wet details: drag a toothpick through contrasting colors for swirls, drop in sprinkles, or pipe a small design on top before the flood sets.
Step 6: Let the Cookies Dry
Leave the cookies flat and uncovered at room temperature for at least 6 to 8 hours. Overnight is the safest bet if you can wait. The icing is fully dry when it feels hard and smooth to a light touch, with no tackiness and no fingerprint.
For a harder, candy-shell finish, leave the cookies an extra hour past dry-to-the-touch, or set a small fan nearby to move air across them. Drying time stretches in humid kitchens and shortens in dry, air-conditioned rooms. If you live somewhere sticky, a dehumidifier in the room makes a noticeable difference.
Once the icing is dry, stack the cookies between sheets of parchment paper in an airtight container. They’ll keep at room temperature for about two weeks. For longer storage, freeze them flat in a single layer first, then transfer to a freezer bag; they’ll hold for a couple of months.
Common Mistakes and Easy Fixes
Most flood problems come down to icing consistency or air. Here are the issues I see most often and how to fix each one.
Icing too runny and flooding over the outline. The flood is thinner than the 10 to 15 second test. Beat in a tablespoon of powdered sugar at a time until a ribbon disappears in about 12 seconds. If a cookie already overflowed, scrape it off with a toothpick before the icing sets and re-outline that section.
Icing too thick and not leveling. The ribbon is sitting on the surface for 20+ seconds or not disappearing at all. Add water a quarter teaspoon at a time, stirring well, until you hit flood range. A thick flood leaves a textured, pebbled surface that won’t smooth out no matter how much you shake the tray.
Air bubbles on the surface. Almost always from mixing on too high a speed or piping too aggressively. Pop them with a toothpick while the icing is still wet. Once a bubble pops, drag the toothpick through the spot to smooth it out.
Outlines breaking and flood icing bleeding under. Either the outline was piped too thin, or the flood was too runny and pushed over the wall. Pipe a thicker, steadier border, and chill the cookies for 5 minutes in the fridge before flooding in warm kitchens.
Crusty skin forming on the bowl. Humidity and exposure to air. Press a damp paper towel directly onto the surface of the icing whenever you’re not using a bowl. If a skin has already formed, skim it off with a spoon or strain the icing through a fine mesh sieve.
Colors bleeding into each other. Usually the underlying flood wasn’t dry enough before the next color was added. Let each color set until it’s dry to the touch, a couple of hours at minimum, before layering or piping a contrasting color next to it. Gel color also bleeds less than liquid.
Helpful Tips for Perfect Flooded Cookies
These are the small habits that separate a decent flooded cookie from one that looks bakery-finished.
Use gel food coloring, not the liquid drops from the grocery store baking aisle. Liquid color adds water to the icing, throws off your consistency, and gives you duller, washed-out shades. A little gel goes a long way.
Keep a damp paper towel pressed onto every bowl of icing between uses, even if you’ll be back in 30 seconds. Royal icing crusts over fast, and that skin is the enemy of a smooth flood.
Transfer the flood icing to squeeze bottles once it’s the right consistency. They give you way more control than piping bags for filling large areas, and you won’t wear out your hand squeezing for two dozen cookies.
Work on a flat, level counter. If your kitchen floor is sloped (some older homes really are), the icing will pool to one side and dry that way. Use a small bubble level on the tray if you suspect a tilt.
Set a small fan across the room, not blowing directly on the cookies, to move air and cut drying time in humid weather. A dehumidifier in the same room works even better if you decorate often.
Chill the cookies 5 to 10 minutes in the fridge before flooding in summer or in a warm kitchen. A cool cookie surface slows the flood just enough that you have time to work before it levels.
Reserve a small bowl of thick outline icing while you flood. If a border breaks or a corner gets nicked, patch it with the thick icing and let it set for a minute before continuing. Patching with flood-consistency icing just creates a new leak.
Don’t skip the sifting of the powdered sugar. A few stray lumps will clog your piping tip right when you need it most.
Frequently Asked Questions
How long does royal icing take to dry on cookies?
Royal icing usually takes 6 to 8 hours to dry at room temperature, and overnight is the safest bet for fully hardened cookies. In humid kitchens, drying can stretch to 12 hours or more. The icing is ready when it feels hard and smooth to a light touch, with no tackiness and no fingerprint. A small fan in the room can speed things up without affecting the finish.
What consistency should royal icing be for flooding?
Flood-consistency royal icing is the texture of a thin glue or warm honey. The standard test is the 10 to 15 second rule: drizzle a ribbon of icing back into the bowl, and if it disappears into the surface in 10 to 15 seconds, the icing is ready to flood. If it vanishes in under 5 seconds, it’s too thin; if it sits on top for 20 seconds or more, it’s still too thick.
Can I flood cookies without piping bags?
Yes. Squeeze bottles and zip-top plastic bags both work well for flooding. For zip-top bags, snip a small corner about 1/8 inch across, fill the bag, and squeeze from the top down. Squeeze bottles give the most control and are easiest on your hand when flooding a couple dozen cookies. A small plastic condiment bottle from the dollar store also works in a pinch.
Why are air bubbles forming on my flooded cookies?
Air bubbles usually come from mixing the icing on too high a speed, or from piping too aggressively and trapping air in the flood. The fix is to pop each bubble with a toothpick or scribe tool within a minute or two of flooding, while the icing is still wet. Then drag the toothpick lightly over the spot to smooth the surface. Mixing on medium rather than high also reduces bubbles from the start.
Can royal icing be made ahead of time and stored?
Yes. Royal icing keeps in an airtight container at room temperature for up to two weeks, and in the fridge for about a month. Press plastic wrap directly onto the surface so a skin doesn’t form, then seal the container. Before using, give it a quick stir and recheck the consistency, since icing thickens as it sits. Add a few drops of water if it’s no longer in flood range.
How thin should I make royal icing for flooding?
Aim for the 10 to 15 second rule: drizzle a ribbon of icing back into the bowl, and it should melt into the surface within about 10 to 15 seconds. That texture is somewhere between warm honey and Elmer’s glue. Thinner than that and the icing runs off the cookie; thicker than that and it sits in ridges and won’t level on its own. Always thin a little at a time, since a quarter teaspoon of water can change the consistency a lot.
Pick a quiet afternoon, bake a batch of sugar cookies, and try the full flood process on six of them before committing to a whole tray. The first cookie is rarely perfect, the second is better, and by the sixth you’ll have the 10 second rule down without thinking. Once you see that glossy surface for the first time, you’ll want to flood everything in sight.